On this page, I explain how I test and score bicycle pumps so you get a better idea of the details. Each category’s results contribute to my overall verdict on the bicycle pump’s quality.
I evaluate them on a scale of 1-5, where 1 is the worst and 5 is the best. I also differentiate between floor, shock, and mini bike pumps.
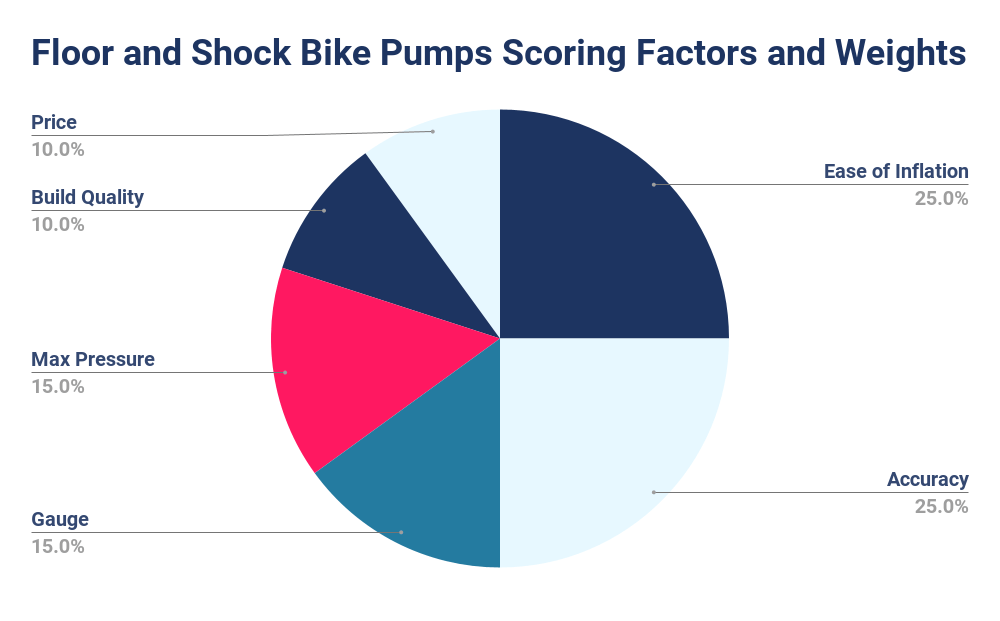
Floor and shock bike pumps:
Ease of Inflation 3/5 | Accuracy 4/5 | Gauge 2/5 | Max Pressure 3/5 | Build Quality 3/5 | Price 5/5 | WEIGHTED OVERALL SCORE 3.3/5
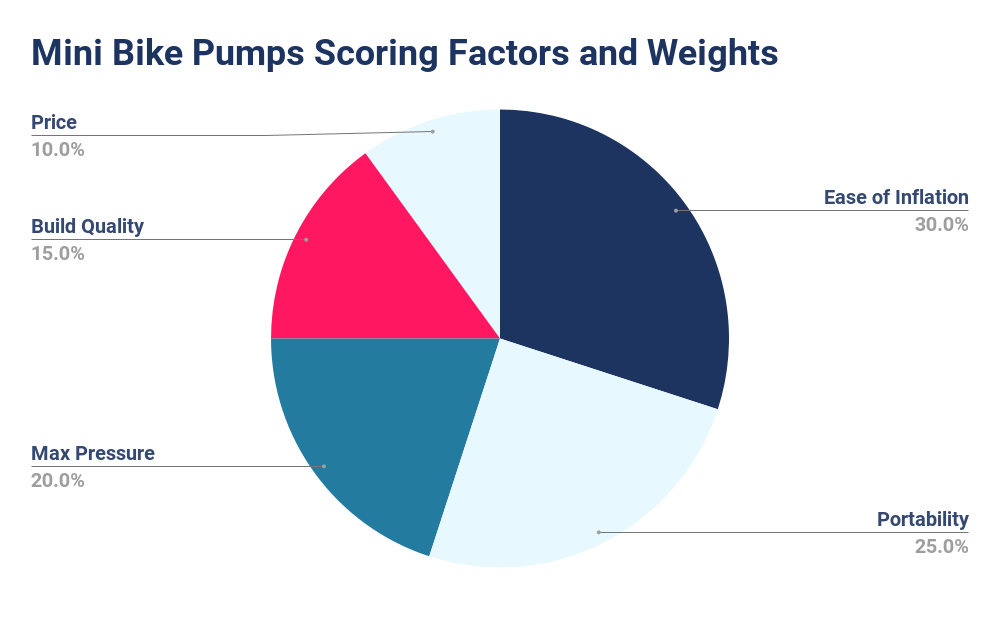
Mini bike pumps:
Ease of Inflation 5/5 | Portability 3/5 | Max Pressure 2/5 | Build Quality 5/5 | Price 4/5 | WEIGHTED OVERALL SCORE 3.8/5
Scores 1–2.5 are RED, 2.6–3.9 are ORANGE, and 4–5 are GREEN.
I score the following criteria on a scale based mainly on in-depth market research. This includes evaluating my and other owners’ experiences and comparing the bicycle pump features with competing alternatives. The scores are weighted, meaning each feature has a different importance. For example, the ease of inflation is more important than the gauge.
I approach each bicycle pump as objectively as possible. However, like everyone, I am subject to biases and expectations.
Scoring Criteria for Bicycle Pumps Features
Below is the list of the features of bicycle pumps with an explanation of the scoring.
Ease of Inflation
Ease of inflation illustrates how convenient it is to inflate tires using the pump. I consider factors such as the smoothness of the pumping, ergonomic handle, and overall user experience during inflation (i.e., the stability of the pump, the force needed when inflating high pressures, ease of attaching the head, etc.).
- 1 – E.g., the pump is unstable, not ergonomic, and requires high effort when inflating.
- 2
- 3
- 4
- 5 – E.g., the pump is stable, ergonomic, and requires lower effort when inflating.
Accuracy
Accuracy refers to how precisely the pump delivers the desired air pressure to the tire. A reliable and accurate pump ensures tires are inflated to the correct pressure. Some pumps can be accurate at higher pressures and less accurate at lower pressures (and vice versa). Air leakage when the tire inflator head is removed also affects accuracy. Top pumps are accurate to 2 PSI, while less accurate (and less reliable) ones are more than 10 PSI.
- 1 – E.g., the deviation is 10 PSI or more.
- 2
- 3
- 4
- 5 – E.g., the deviation is below 2 PSI.
Gauge
The gauge measures the air pressure and provides feedback to the user. I found out that many gauges are hard to read. A clear and accurate gauge is essential for monitoring tire pressure during inflation, ensuring that it aligns with the desired level. Remember that I don’t evaluate the pump’s accuracy when evaluating the gauge. I mainly focus on its readability and design.
- 1 – E.g., the gauge is hard to read.
- 2
- 3
- 4
- 5 – E.g., the gauge is easy to read.
Portability
I only include the portability in the mini bike pump scoring, as this is the type of pump many of us carry around with us. I particularly look at the pump’s dimensions and weight and how it mounts to the frame. Most mini bike pumps come with a mount under the bottle cages, but there are some that come with a rubber strap or without a mount.
- 1 – E.g., the pump is long, heavy, or hard to carry.
- 2
- 3
- 4
- 5 – E.g., the pump is light, compact, and easy to carry.
Max Pressure
This criterion indicates the maximum pressure that the pump can achieve. For most scenarios of using a floor pump, 120 PSI is enough. For example, I inflate just about 60 PSI in my 28mm tubeless road tires. However, track cyclists may need more powerful pumps. I consider anything above 160 PSI as an overkill for most people. The scale for shock pumps is a bit different. See more details below.
Floor Bike Pumps
- 1 – Below 100 PSI
- 2 – Between 100 and 119 PSI.
- 3 – Between 120 and 139 PSI.
- 4 – Between 140 and 159 PSI.
- 5 – 160 PSI and more.
Shock Bike Pumps
- 1 – Below 100 PSI
- 2 – Between 100 and 199 PSI.
- 3 – Between 200 and 299 PSI.
- 4 – Between 300 and 399 PSI.
- 5 – 400 PSI and more.
Build Quality
Build quality refers to the pump’s overall construction, durability, and reliability. A well-built pump is sturdy, resistant to wear and tear, and capable of withstanding frequent use over time without compromising performance. The top pumps are usually made mostly of higher-quality materials like steel or aluminum, not plastic.
- 1 – E.g., the pump is poorly built and mostly uses cheap materials.
- 2
- 3
- 4
- 5 – E.g., the pump is well-built and mostly uses more expensive materials.
Price
The price reflects the recommended retail price of the pump. It’s an important factor for many when making purchasing decisions, as they seek value for money and affordability. Often, the more expensive the pump, the better the build quality. But there are exceptions. The evaluation is as follows:
- 1 – Above $200.
- 2 – Between $150 and $199.
- 3 – Between $100 and $149.
- 4 – Between $50 and $99.
- 5 – Below $50.
Conclusion
I try to be as objective as possible when testing bicycle pumps (and all other products). I aim to communicate my experience to potential buyers and help you make educated buying decisions.
Please remember that I am still tweaking and improving this procedure to provide you with the most valuable information possible.
I am open to suggestions on how to improve. Feel free to contact me.
Recent Updates
- Mar 5, 2024: V1.0 testing procedure introduced.