On this page, I explain how I test and score bike trainers so you get a better idea of the details. Each category’s results contribute to my overall verdict on the bike trainer’s quality.
I currently differentiate two types of criteria:
- Objective
- Subjective
I evaluate them on a scale of 1-5, where 1 is the worst and 5 is the best. It looks as follows:
Resistance & Gradient 3/5 | Accuracy 3/5 | Noisiness 4/5 | Power Consumption 3/5 | Ride Feel 3/5 | ERG Mode 2/5 | Ease of Setup 4/5 | Portability 2/5 | OVERALL 3.0/5
Scores 1–2.5 are RED, 2.6–3.9 are ORANGE, and 4–5 are GREEN.
My scoring is not weighted, and I am aware of this limitation. I am working on an updated scoring to better reflect the importance of certain features (like accuracy vs. portability).
In the meantime, you can use the following table I designed. It scores trainers based on the importance of each feature to you. The sheet then calculates the overall score of the bike trainer based on my earlier rating of the given feature.
I recommend creating a copy of the spreadsheet by clicking FILE > CREATE COPY to avoid overwriting data with others.
Objective Criteria
Objective criteria are measurable, allowing me to compare the bike trainers with each other easily. They include measuring maximal resistance, gradient simulation, accuracy, noisiness, and power consumption.
Maximal Resistance and Gradient Simulation
The maximal resistance and gradient simulation tell you about the overall performance of the trainer.
However, the values of mid-range and high-end trainers are almost irrelevant to the majority population. They are so high that only some professionals can reach them.
On the other hand, a trainer’s ability to quickly and accurately simulate gradient changes often goes hand-in-hand with their performance.
It may happen that the maximum claimed gradient or resistance doesn’t meet the reality. If so, I will comment on it accordingly. This happened to me when I reviewed the ThinkRider X7 Pro.
The ratings are as follows:
- 1 – The resistance is below 500W, and the gradient simulation is below 5%.
- 2 – The resistance is between 500 and 999W, and the gradient simulation is between 5 and 10%.
- 3 – The resistance is between 1000 and 1499W, and the gradient simulation is between 10 and 15%.
- 4 – The resistance is between 1500 and 1999W, and the gradient simulation is between 15 and 20%.
- 5 – The resistance is above 2000W, and the gradient simulation is above 20%.
For an illustration, here are the claimed maximum resistances of the best smart bike trainers:
And here are the claimed gradients:
Accuracy
This category does not apply to non-smart trainers.
I distinguish between claimed and measured accuracy. The claimed accuracy is that of the manufacturer. The measured accuracy is what I get from a series of tests and comparisons with other power sources.
The test series includes 3 basic tests:
- ERG mode
- Freeride
- Race
I convert the measured accuracy to positive numbers and average them. I do the conversion to find the average deviation from the base. If I averaged the values of, e.g., 1% and –1%, the deviation would be 0%, which is mathematically true, but realistically it gives a false idea about the trainer’s accuracy. After the conversion, the accuracy is ±1%.


The main data source I use is Favero Assioma DUO power meters. They have a claimed accuracy of ±1% and are among the most reliable pedal power meters. I use them as a base. As another source, I use a Magene P505 spider power meter.
Before testing, I always update the smart trainer to the latest firmware, warm it up by riding it for about 10 minutes, and perform the calibration. I don’t do manual calibration before each ride if the trainer has auto-calibration.
Here are the points and the accuracy intervals.
- 1 – The measured accuracy is worse than ±4%.
- 2 – The measured accuracy is (±3-4%].
- 3 – The measured accuracy is (±2-3%].
- 4 – The measured accuracy is (±1-2%].
- 5 – The measured accuracy is better than ±1%.
For an illustration, here are the claimed accuracy rates of the best smart bike trainers:
Noisiness
I measure the noise level of the trainers using the Decibel X app. When measuring, I make sure that the chain is properly lubricated. For most smart trainers, the noise level of the trainer is lower than the noise level of the moving parts of the bike (drivetrain).
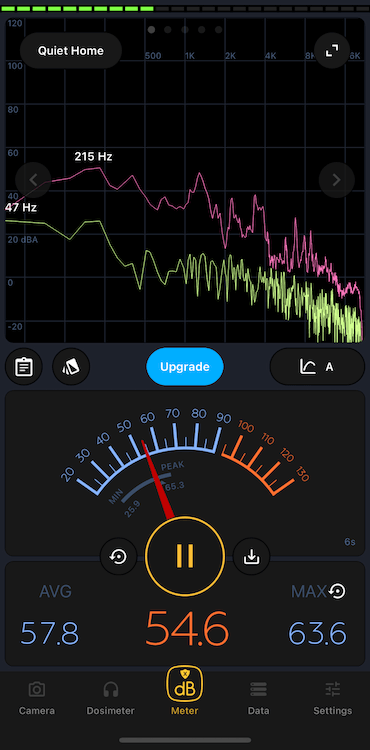
I measure the noisiness at about 200W and a cadence of 70 RPM. I hold the phone (microphone) about half a meter from the trainer.
The sound intervals are as follows:
- 1 – The average noisiness is above 66dB.
- 2 – The average noisiness is (63, 66dB].
- 3 – The average noisiness is (60, 63dB].
- 4 – The average noisiness is (57, 60dB].
- 5 – The average noisiness is below 57dB.
Power Consumption
This category does not apply to non-interactive trainers.
I measure the smart trainers’ power consumption [Wh] using an electricity usage monitor at different resistance levels (200W and 300W).
Although this feature does not have a high weight for most people, I decided to include it in the evaluation for interest.
The rating is as follows:
- 1 – The power consumption is higher than 20Wh at 200W.
- 2 – The power consumption is between 15Wh and 20Wh at 200W.
- 3 – The power consumption is between 10Wh and 15Wh at 200W.
- 4 – The power consumption is between 5Wh and 10Wh at 200W.
- 5 – The power consumption is below 5Wh at 200W or zero (the trainer can operate without electricity using the energy generated by pedaling).
Subjective Criteria
The subjective criteria are mainly based on my experience. They are based more on ‘feel’ and subjective evaluation. Nevertheless, I tried to design the evaluation of subjective criteria to be as objective as possible.
Ride Feel
The ride feel is one of the most difficult features to describe. From my experience, trainers differ in how they can adjust the resistance when the gradient changes (in a 3rd party indoor cycling app), similar to an ERG mode.
The non-interactive bike trainers can’t simulate or adjust resistance, so their ride feel is worse than the feel of smart bike trainers.
Therefore, ratings 1 and 2 are for dumb trainers, while the other three are for smart bike trainers:
- 1 – Bad non-interactive bike trainer (manually adjusted resistance, flywheel with low inertia, etc.).
- 2 – Good non-interactive bike trainer (outside-like ride feel thanks to heavy flywheel or progressive resistance).
- 3 – Responsivity to gradient changes is not accurate or quick. The trainer can’t reliably simulate steep gradients.
- 4 – Quick and accurate responsivity to gradient changes, but the trainer doesn’t offer any extra features.
- 5 – Quick and accurate responsivity to gradient changes. The trainer also offers extra features like surfaces or decline simulation.
ERG Mode Quality
This category does not apply to non-interactive trainers.
ERG mode is one of the most important features for people who do structured training. However, every smart trainer executes it differently. I always use the TrainerRoad app to test ERG mode.

The biggest difference I noticed is in the time it takes to change the resistance and the smoothness of these changes. Some trainers change it exponentially, while some more gradually.
Another important thing is that the trainer can adjust the resistance precisely when you change cadence to keep you at a given wattage and whether it “overshoots” the resistance.
I tried to put these scenarios in words. So the scoring is as follows:
- 1 – The trainer changes the resistance too quickly and inaccurately. It struggles with adjusting it when you change cadence.
- 2 – The trainer changes the resistance too quickly or inaccurately. It may struggle to adjust it when you change cadence.
- 3 – The trainer changes the resistance too quickly but accurately. Sometimes it may struggle to adjust it when you change cadence.
- 4 – The trainer changes the resistance relatively smoothly and accurately. It usually doesn’t struggle to adjust it when you change cadence.
- 5 – The trainer changes the resistance smoothly and accurately. It doesn’t struggle with adjusting it when you change cadence.
Ease of Setup
The ease of setup includes multiple things, mainly the installation of a cassette, assembly of the trainer, and mounting of the bike.
Having the cassette included and preinstalled saves you time and money. Unfortunately, not every direct-drive trainer comes with it.

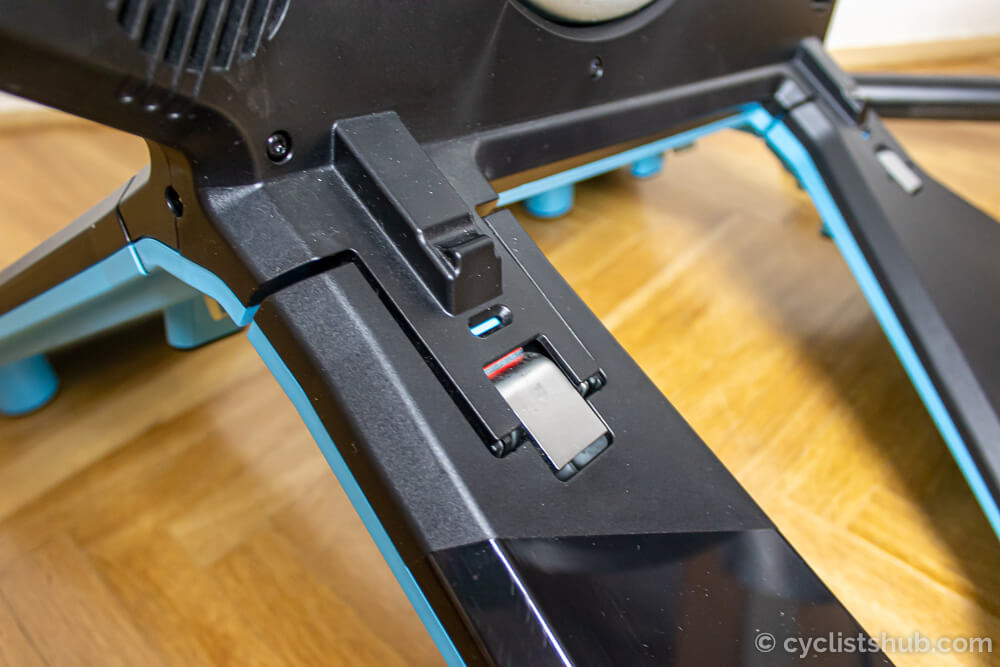

Some trainers also require more steps than others (for example, assembling their legs instead of just unfolding them).
Therefore, the scoring is as follows:
- 1 – The trainer comes without a preinstalled cassette and is very difficult to set up. It requires multiple steps that are hard to understand or poorly described in the manual.
- 2 – The trainer comes without a preinstalled cassette, and it is difficult to set up. It requires multiple steps, but they are decently described in the manual.
- 3 – The trainer comes with or without a preinstalled cassette, but it’s easy to set up. The steps are easy to understand and well-described in the manual.
- 4 – The trainer comes without a preinstalled cassette and is very easy to set up. It requires you to only unfold it, choose the correct adaptors, and mount your bike. You don’t need a manual for it.
- 5 – The trainer comes with a preinstalled cassette and is very easy to set up. It requires you to only unfold it, choose the correct adaptors, and mount your bike. You don’t need a manual for it.
Portability
The portability will be important to some people more than to others. Those with a dedicated training area and space for the trainer will probably not need to move the trainer often.


Conversely, those who always have to set it up and clean it up will prefer its easy portability.
- 1 – The bike trainer is almost impossible to move around with a mounted bike. E.g., it has no handle and is too heavy or bulky.
- 2 – The bike trainer is very difficult to move around with a mounted bike. E.g., it has no handle, and it’s relatively heavy and difficult to hold.
- 3 – The bike trainer is difficult to move around with a mounted bike. E.g., it has no handle (or it’s in an impractical position), and it’s relatively heavy but not too difficult to hold.
- 4 – The bike trainer is relatively easy to move around with a mounted bike. E.g., it’s easy to hold (even without a handle) and not too heavy.
- 5 – The bike trainer is very easy to move around with a mounted bike. E.g., it has a handle and is easy to move around with a mounted bike.
Conclusion
I try to be as objective as possible when testing bike trainers (and all other products). I aim to communicate my experience to potential buyers and help you make educated buying decisions.
Please remember that I am still tweaking and improving this procedure to provide you with the most valuable information possible.
I am open to suggestions on how to improve. Feel free to contact me. Here is the list of all the bike trainers I reviewed:
Recent Updates
- Dec 12, 2023: V1.0 testing procedure introduced.